
What is a Digital Footprint of Photos and Videos, To (Recover deleted Photos and Videos)?
A digital footprint refers to the trail of data you leave behind when you use digital devices or online platforms. Specifically, a digital footprint of photos and videos includes all the images and videos you’ve shared, uploaded, stored, or interacted with across various devices and services. This footprint can exist in multiple forms, both visible and hidden, across the internet and offline storage systems.

Permanently deleted Videos, Photos Recovery Software (safe and secure)
- Autopsy
- Diskdigger
Tools for Recover deleted Photos and Videos
1. What is Autopsy?
Autopsy is a free and open-source digital forensics tool designed to analyze storage devices and recover deleted photos and videos, data. Developed as a user-friendly interface for The Sleuth Kit, it is widely used by law enforcement, cybersecurity professionals, and IT experts to investigate digital evidence. Autopsy excels in file recovery, timeline analysis, keyword searches, and more. It can recover deleted photos and video, files, including photos and videos, even if they were removed or lost due to formatting or corruption.
Features of Autopsy
- File Recovery: Retrieve deleted or lost files from storage devices.
- File System Analysis: Analyze disk images or drives for specific data.
- Keyword Search: Locate files containing specific words or metadata.
- Timeline Creation: Reconstruct activities based on timestamps.
- Supported Formats: Works with various file types (e.g., FAT, NTFS, exFAT) and disk image formats (e.g.,
.dd,.img).
Step-by-Step Guide to Recover deleted Photos and Videos Using Autopsy
Follow this detailed guide to use Autopsy for recovering lost or deleted photos and videos:
Step 1: Download and Install Autopsy
Download: Visit the official Autopsy website and download the latest version compatible with your operating system (Windows, Linux, macOS).
Download here !
Install: Run the downloaded installer and follow the setup wizard. Ensure that the Sleuth Kit and necessary modules are included.
Verify Installation: Once installed, launch Autopsy to confirm it’s functioning correctly.
Step 2: Prepare Your Data Source
Before starting the recovery process, ensure you have access to the device or image file containing the lost data:
- Physical Drives: Connect the drive (e.g., USB, SD card, or external HDD) to your computer using a USB adapter if necessary.
- Disk Images: If you have a disk image file (e.g.,
.dd,.img), ensure it is accessible on your computer. Disk images are safer to work with as they prevent modification of the original data.
Step 3: Launch Autopsy and Create a New Case
- Open Autopsy: Start the application.
- Create a New Case:
- Click “New Case” on the startup screen.
- Provide a case name and choose a location on your computer to save case data.
- Configure Case Details: Fill in optional information like investigator name, case number, and notes to keep track of your project.
- Proceed: Once details are entered, click “Finish” to create the case.

4. Add a Data Source
Choose Add Data Source and select the appropriate option based on your source:
- Disk Image or VM File for forensic images (e.g.,
.dd,.E01). - Local Disk for directly attached devices.
Browse and select the data source, then click Next.
5. Configure Ingest Modules
During the data source setup, Autopsy allows you to select “Ingest Modules” to process the data. For recovering photos and videos, select:
- File Type Identification: Categorizes files by type.
- Keyword Search: Identifies relevant files using keywords.
- PhotoDNA (if available): Scans for specific photo signatures.
- Data Carving: Recovers deleted or fragmented files based on file signatures.
Click Next to start the analysis.
6. Analyze the File Tree
- After processing, explore the file tree in the Data Sources tab.
- Look under folders like:
- Extracted Content: Shows files Autopsy recovered, including deleted items.
- Pictures and Videos: Pre-categorized files based on their extensions or metadata.
- Use the built-in file viewer to preview photos or videos.

7. Filter for Specific File Types
- To narrow down results:
- Use the Filter option to show only specific file types (e.g.,
.jpg,.png,.mp4,.avi). - Search for keywords or file extensions in the search bar.
- Use the Filter option to show only specific file types (e.g.,
8. Recover Deleted Files
- If files were deleted, Autopsy’s Data Carving module may have recovered them.
- Navigate to the Carved Files section to find reconstructed files based on signatures.
9. Export Recovered Files
- To save recovered photos or videos:
- Right-click on the desired files and select Extract File(s).
- Choose a safe destination folder and click OK.
- Repeat for multiple files or folders as needed.
10. Review Metadata and Hashes
- Autopsy provides detailed metadata for each file, such as timestamps and creation dates.
- Use the hash values (MD5 or SHA-256) to verify file integrity if needed.
11. Generate a Report
- To document findings:
- Go to Generate Report.
- Select the format (e.g., HTML, Excel, or plain text).
- Include relevant details, such as recovered files and their locations.
12. Save and Close the Case
- Once done, save your work. Autopsy keeps all case data for future reference.
Tips for Effective Recover deleted Photos and Videos
- Use Write Protection: Always analyze a forensic image or use a write-blocker for physical media to preserve the original data.
- Be Patient: Processing large disks or fragmented files can take significant time.
- Understand File Signatures: Deleted files may not retain their original names. Autopsy relies on file signatures to identify types.
- Backup: Ensure you back up the recovered files to a secure location.
Limitations
- Recovery success depends on file fragmentation and whether the storage media has been overwritten.
- For advanced recovery (e.g., corrupted video files), use specialized tools like PhotoRec or Stellar Data Recovery alongside Autopsy.
By following these steps, you can effectively use Autopsy to recover lost photos and videos (Recover deleted Photos and Videos) from a variety of storage media.
2. What is Diskdigger ?
DiskDigger is a simple and effective data recovery tool for recovering deleted photos and videos from storage devices like hard drives, USB drives, memory cards, and even smartphones. Below is a step-by-step guide on how to use DiskDigger to recover deleted photos and videos.

Step-by-Step Guide to Recover deleted Photos and Videos with DiskDigger
1. Download and Install DiskDigger
- Visit the official DiskDigger website to download the software.
- Choose the appropriate version for your operating system (Windows, Linux, or Android).
- For Android devices, you can install the app directly from the Google Play Store.
Download here !
2. Launch DiskDigger
- Open the DiskDigger application on your device.
- If you’re using Windows or Linux, ensure the software runs with administrative privileges for full access to storage devices.
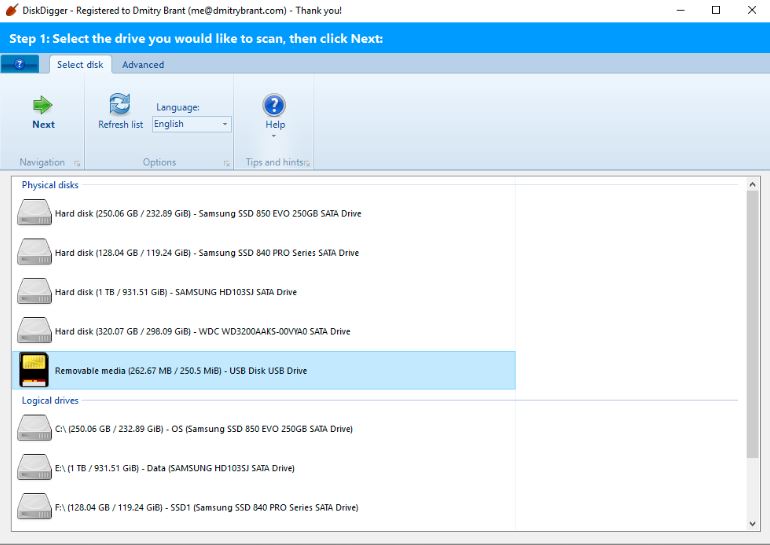
3. Select the Target Storage Device
- DiskDigger will display a list of available storage devices and partitions.
- Choose the drive, USB stick, memory card, or any other storage device where the photos or videos were stored.
- Click Next to proceed.
4. Choose the Scan Type
- DiskDigger offers two scan modes:
- Basic Scan: Ideal for recovering recently deleted files. Suitable for file systems like FAT, NTFS, and exFAT.
- Deep Scan: A thorough scan that searches for file signatures. This is recommended for recovering lost or corrupted data.
- Select the appropriate option based on your needs, then click Next.
5. Specify File Types to Recover
- To save time, configure the scan to look for specific file types:
- For photos: Select file extensions such as
.jpg,.png,.gif, etc. - For videos: Select extensions like
.mp4,.avi,.mov, etc.
- For photos: Select file extensions such as
- This step ensures DiskDigger focuses on only relevant data.
6. Start the Scanning Process
- DiskDigger will now scan the selected storage device.
- The scan progress will be displayed along with a list of files as they are detected.
- You can preview the files during the scan to verify their content.
7. Review and Select Recoverable Files
- Once the scan is complete, browse the list of recoverable files.
- Use the preview feature to check if the files (photos/videos) are intact.
- Select the files you want to recover by checking the boxes next to them.
8. Recover the Files
- After selecting the files, click the Recover button.
- Choose a recovery destination:
- Save the files to a different storage device or partition to avoid overwriting data on the original drive.
- Confirm the recovery, and DiskDigger will restore the selected files to the chosen location.
9. Save the Results (Optional)
- DiskDigger allows you to save a report of the recovered files.
- This step is useful for keeping track of what was recovered.
10. Safeguard Your Data
- Once your photos and videos are recovered, consider creating backups to prevent data loss in the future.
- Use external drives, cloud storage, or reliable backup software.
Additional Tips
- For Android Users: If you’re recovering files from an Android device, you may need root access for the best results.
- Free vs. Pro Version: DiskDigger’s free version focuses on recovering photos and videos. The Pro version supports more file types and advanced features.
- Stop Using the Device Immediately: Avoid using the storage device after data loss to prevent overwriting recoverable files.
For more –

Hi, I’m Narinder Kumar, founder of BlogsBuz.com. I create articles and generate celebrity biographies, providing verified, up-to-date content. As an SEO expert and online tools creator, I also share practical tips on making money online, finance management, blogging, and passive income. My mission is to provide accurate information and keep you away from fake content, ensuring you stay well-informed and make smart decisions online.
Your article helped me a lot, is there any more related content? Thanks!
Thanks you so much visit my website. Share this website with your freinds and get your quiries, Thanks.